You are here: Foswiki>Homepages Web>CreateHomepageTopic>HomepageWitoldPrzygoda>HNtuple (2009-09-21, WitoldPrzygoda)Edit Attach
HNtuple
Source code
Here you can download the source code: HNtuple.tar.gz (version from 21 Sept 2009)Unpack: tar xvfz HNtuple.tar.gz
The code will be unpacked to your present directory. Files:
hntuple.h, hntuple.cc, TupleLinkDef.h, MakeSO Compile: make -f MakeSO
Library files (static and dynamic) will be created. The name of a dynamic library is libTuple.so
Clean code: make -f MakeSO clean
Learn by example
Let's try to create our HNtuple object interactively.Launch
root and load the library: gSystem->Load("libTuple.so") Now
root knows the new abstract type HNtuple. Create the object: HNtuple myObj("test", "some description");
As you can see, you do not need to define the list of variables, just start putting some values:
myObj["id"] = 2;
myObj["mass"] = 0.511;
Let us fill the ntuple now!
myObj.fill(); Since now the list of variables in your HNtuple is fixed and you cannot add them any more. But you can go on with filling some new values to existing variables. For example:
myObj["id"] = 3;
myObj["mass"] = 0.611;
myObj.fill();
myObj["id"] = 3;
myObj["mass"] = 0.551;
myObj.fill();
Usually, you do such a cycle (putting new set of values and filling the ntuple) in a loop or in a function called every event. At any moment you can print or draw your HNtuple. Remember that
root identifies objects by their names, our HNtuple's name is test test->Print();
test->Draw("id");
test->Draw("mass");
You want to write your HNtuple to a file. Let us create a new file: TFile myFile("myrootfile.root", "recreate");
.ls Oh no! My object has disappeared! Not quite, if you typed .pwd prior to file creation you would see
Rint:/ Now if you type .pwd you will see
myrootfile.root:/ In other words, all
root objects are placed in some directories. We would like to have our HNtuple in a directory of a new file in order to write it. We have to change the directory the HNtuple is attached to. First, let's create the pointer to TDirectory with the file: TDirectory *ptr = &myFile; This is so easy, because TFile is inherited directly from TDirectory type. Now we can go back to the directory with our HNtuple:
gDirectory->cd("Rint:/"); We will move the HNtuple object to the file directory.
test->SetDirectory(ptr);
ptr->cd();
.ls You see that your HNtuple is in the file directory and you can easily write it.
test->Write();
myFile.Close(); Exit the
root now (.q) and reopen it with the file just created: root -l myrootfile.root What you see inside is just NTuple (not HNtuple) and you can draw it without any library loading.
How to use it
Let us have a look at the interface of the HNtuple class to address some possible questions about the usage.
class HNtuple: public TObject
{
  public:

   HNtuple();
   HNtuple(const char* name, const char* title, Int_t bufsize = 32000);
   HNtuple(const char* name, const char* title, const char* varlist, Int_t bufsize = 32000);
   virtual ~HNtuple();

   Int_t Write(const char* name, Int_t option, Int_t bufsize);
   Float_t& operator[](const std::string& key);
   const Float_t& operator[](const std::string& key) const;
   Int_t fill();

  private:

    TNtuple *ptrNt;
    // ... the rest of the class
};
- To use this type you have to include the header file
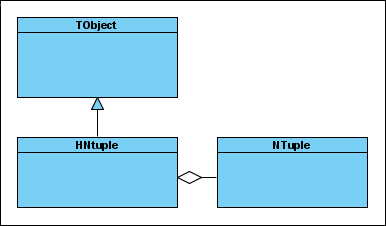
#include "hntuple.h" - HNtuple is inherited from TObject (and not from HNtuple) because I wanted to store as the output NTuple type. It would be impossible when deriving from NTuple. The diagram looks as follows:

- The naming convention of class methods is that they start with small letters... but the
roothas a different approach and I had to keepWritemethod with a capital letter to have a polymorphic behaviour. Note that all arguments of aWritemethod have some default values defined in a base class, that is, in TObject. Therefore we can simply callWrite() - You can book HNtuple in a classical way, like any
rootNTuple. In such a case you cannot extend the list of variables, they are fixed by your definition. However, filling of variables is the same as in the example, i.e.myNTuple["variable"] = 7.0;and the order of filling is completely arbitrary (no more remembering of the proper sequence of variables in Float_t* array, in fact, there is none variable array now). Once you have put the values, callfill()method.
| I | Attachment | Action | Size | Date | Who | Comment |
|---|---|---|---|---|---|---|
| |
HNtuple.tar.gz | manage | 3 K | 2009-09-21 - 19:42 | WitoldPrzygoda | HNtuple (21 Sept 2009) |
| |
hntuple_diagram.gif | manage | 2 K | 2007-07-05 - 16:46 | WitoldPrzygoda | UML diagram |
Edit | Attach | Print version | History: r2 < r1 | Backlinks | View wiki text | Edit wiki text | More topic actions
Topic revision: r2 - 2009-09-21, WitoldPrzygoda
Copyright © by the contributing authors. All material on this collaboration platform is the property of the contributing authors.
Ideas, requests, problems regarding Foswiki Send feedback | Imprint | Privacy Policy (in German)
Ideas, requests, problems regarding Foswiki Send feedback | Imprint | Privacy Policy (in German)


