You are here: Foswiki>DaqSlowControl Web>HadesDaqDocumentation>DetectorControlSystem>SCSLVsupply (2022-03-23, PeterZumbruch)Edit Attach
LV power supplys
Table of SCS controlled LV power supply nodes
| Name | IP | Type | LAN-Version | max. Voltage | Task/Detector | Nominal Voltage | Comment |
|---|---|---|---|---|---|---|---|
| hadps001 | 192.168.100.31 | ||||||
| hadps002 | 192.168.100.32 | ||||||
| hadps003 | 192.168.100.33 | GEN50-30-LAN | 1U1K-IP:4.5-2.0.OCT08-CVP18P1 | 50 V | MDC/TOF/Central | +48V | |
| hadps004 | 192.168.100.34 | ||||||
| hadps005 | 192.168.100.35 | GEN8-180-LAN | 1U1K-IP:4.5-2.0.OCT08-CVP18P1 | 8 V | MDC | +3.8V | |
| hadps006 | 192.168.100.36 | ||||||
| hadps007 | 192.168.100.37 | ||||||
| hadps008 | 192.168.100.38 | GEN8-180-LAN | 1U1K-IP:4.5-2.0.OCT08-CVP18P1 | 8 V | MDC | +3V | |
| hadps009 | 192.168.100.39 | GEN50-30-LAN | 1U1K-IP:4.5-2.0.OCT08-CVP18P1 | 50 V | RPC | +48V | |
| hadps010 | 192.168.100.40 | GEN50-30-LAN | 1U1K-IP:4.5-2.0.OCT08-CVP18P1 | 50 V | RPC | +48V | |
| hadps011 | 192.168.100.41 | GEN50-30-LAN | 1U1K:5.0.1-LAN:2.0 | 50 V | RPC/SHOWER/FW | +48V | |
| hadps012 | 192.168.100.42 | ||||||
| hadps013 | 192.168.100.43 | GEN8-180-LAN | 1U1K-IP:4.5-2.0.OCT08-CVP18P1 | 8 V | MDC | +6V | |
| hadps014 | 192.168.100.44 | GEN8-180-LAN | 1U1K-IP:4.5-2.0.OCT08-CVP18P1 | 8 V | MDC | -3V | |
| hadps015 | 192.168.100.45 | GEN8-180-LAN | 1U1K-IP:4.5-2.0.OCT08-CVP18P1 | 8 V | MDC | +1.8V | |
| hadps016 | 192.168.100.46 | GEN50-30-LAN | 1U1K:5.0.1-LAN:2.0 | 50 V | RICH | +48V | |
Manuals
TDK Lambda Genesys
- Manual:
- several LAN Interface Versions are in use and available.
- current (US):
- current (DE):
- before 2.0 (2007-2008)
- 2.0 onwards:
- 2.1:
Tips, Tricks, and HowTo
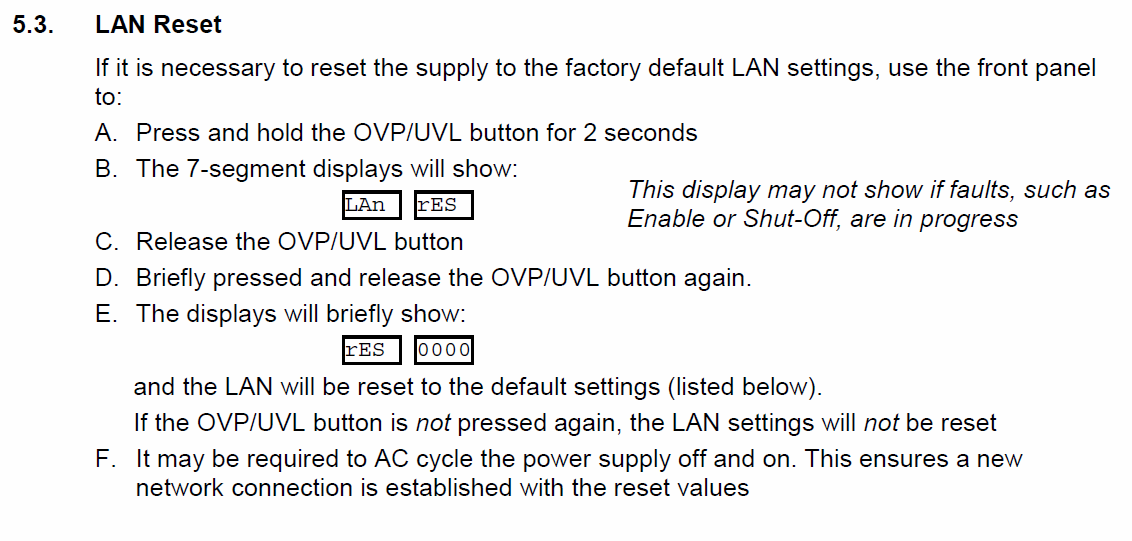
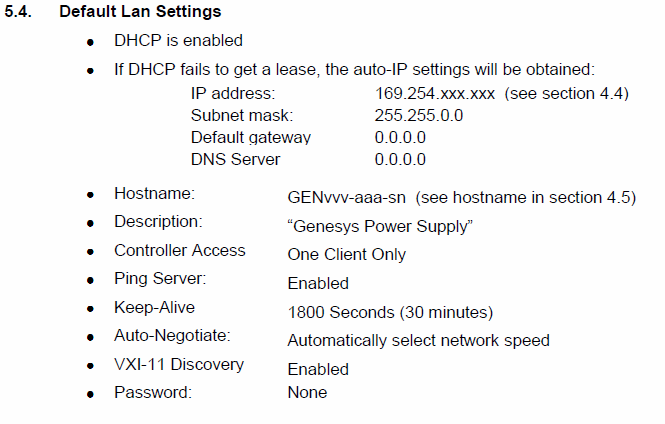
LAN reset/defaults
- LAN reset (p17) LAN manual:

- LAN defaults:

How to set up parallel operation of TDK Lambda power supplies
-
Only power supplies of the same model ( e.g 8V-150A or 50V-30A ) can be connected to
increase the output current. Up to 3 slave supplies can be connected to one master supply.
The control connection is made only via the master supply.
- prepare master and slave setup
- switch the power on
- press the FINE button for three seconds
- rotate the CURRENT encoder for the master to the appropriate setting according to the total number of supplies (
H2for 1 slave,H3for 2 slaves,H4for 3 slaves) - for the slave rotate the encoder to
S(for slave) - press FINE button again and release or wait at least 5 seconds
- switch off the power to store the setting in NVRAM
- Front panel display after master/slave set up:
- make local programming connections
- make solid connections between all +V0 terminals and all -V0 terminals and connect to load
- To restore to original setting (single supply)
- remove local programming cable
- on master and slaves
- press FINE for 3 seconds, rotate CURRENT encoder to
H1 - press FINE button again and release or wait at least 5 seconds
- switch off to store in NVRAM
- press FINE for 3 seconds, rotate CURRENT encoder to
- (on the slave(s) (?)) set SW1 position 2 to
OFFposition
-- PeterZumbruch - 23 Mar 2022
| I | Attachment | Action | Size | Date | Who | Comment |
|---|---|---|---|---|---|---|
| |
LANdefault.png | manage | 44 K | 2012-10-01 - 17:35 | PeterZumbruch | LAN defaults |
| |
LANreset.png | manage | 75 K | 2012-10-01 - 17:30 | PeterZumbruch | LAN reset (p17) LAN manual |
Edit | Attach | Print version | History: r9 < r8 < r7 < r6 | Backlinks | View wiki text | Edit wiki text | More topic actions
Topic revision: r9 - 2022-03-23, PeterZumbruch
Copyright © by the contributing authors. All material on this collaboration platform is the property of the contributing authors.
Ideas, requests, problems regarding Foswiki Send feedback | Imprint | Privacy Policy (in German)
Ideas, requests, problems regarding Foswiki Send feedback | Imprint | Privacy Policy (in German)


